
As already mentioned in my previous post I did take pictures of every step in the process of making my new little toiletry bag. Being only one step away from a tutorial, I decided to write down everything now that it's still fresh in my mind. So, that's what I have ready for you today: a new tutorial!
There are several reasons why I like this project. Most importantly, the way in which a much loved shirt was put to a new use and will start a new life. But also how all the little details of the shirt fitted in so nicely. The buttons and button holes make for a great alternative to the traditional zipper. The loops in the back, made from the button tab of this former roll up sleeve shirt, can be used either to hang the bag or simply to hold a small rolled up towel or washcloth. But it all started out with the pockets and the cuff screaming 'I would make a great pocket for your lipstick'... I hope this tutorial will be an inspiration to some of you to recycle that favorite shirt and save it from the bag with cleaning rags...
Needed:
- an old dress shirt
- 2 rectangular pieces of linen (or any other fabric), in my case 2 pieces of 24 by 37cm. This could be any size of course, depending on the size of the shirt.
- batting, same size as the 2 rectangular pieces of linen
- sewing machine, thread, pins and needles, ...
- iron
Step 1: Cutting up the shirt
The possibilities are unlimited. The idea was to use the nice features the shirt had like the cuffs, roll up sleeve button tabs, the placket, the yoke...
The picture below shows the parts used.
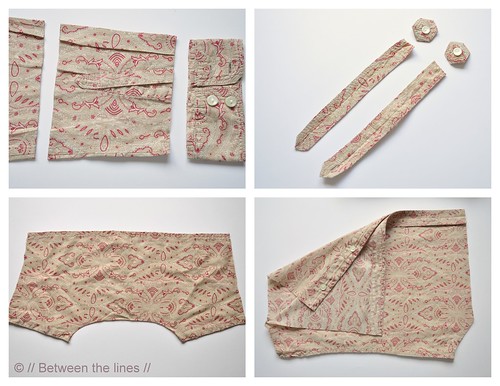
from left to right: the cuff and part of one sleeve, button tabs of both sleeves, the yoke (upper back part), shirt front. All parts were cut close to the top stitched edges or seams.
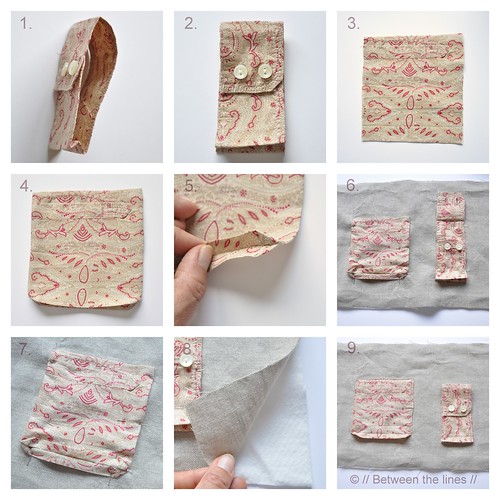
Step 2: Front pockets of the bag
2.1. Take one piece of linen and place it on top of one piece of batting
2.3. Make a pocket from the cuff by folding the cuff as shown in pictures 1 and 2 below. Press with iron. Next pin into place onto the front piece of linen plus batting -picture 6.
2.4. Fold the other sleeve part such that the split faces up - it will figure as the pocket opening. Now cut the piece to size (rectangle or square)- picture 3. Right sides facing, stitch the bottom and side seams closed. Turn inside out, shape and fold in bottom corners as shown in picture 4 and 5. Press with iron. Pin into place onto the linen plus batting - picture 7.
2.5. Now stitch both pockets into place on your sewing machine - picture 9. Press with iron and put aside.
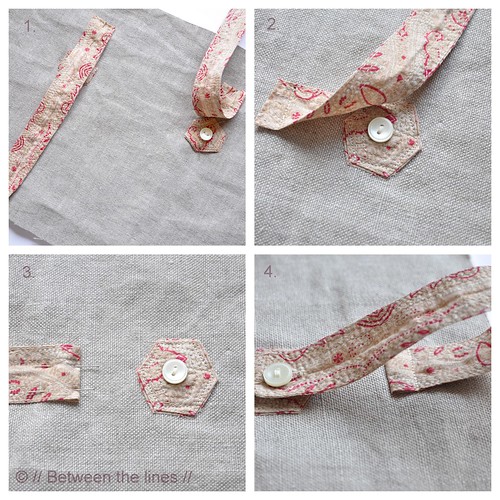
Step 3: The back of the bag - loops
This is an optional step. If you don't have any button tabs on your shirt, you can either make some loops from the left over fabric of the shirt or you can just omit. I added this detail because I liked the finishing of the button tab and button on my shirt and because I find it a handy feature to be able to hang my toiletry bag.
3.1. Take the other set of linen and batting and place them on top of each other.
3.2. Take both sets of button tab and button and place them on top of the linen at equal distances from the sides - as shown in picture 1, making sure the tab points downwards.
3.3. Top stitch into place - picture 2.
3.4. Fold upward the tab and pin into place - picture 3. Top stitch. The result should look as shown in 4.
Step 4: Assembling the bag
4.1. Place front and back on top of each other, right sides facing and stitch the side seams and bottom seam - picture 1.
4.2. Box the corners by folding the bottom corners as shown - picture 2. Sew into place.
4.3. When finished turn inside out again; the bag should look as shown in pictures 3 and 4.

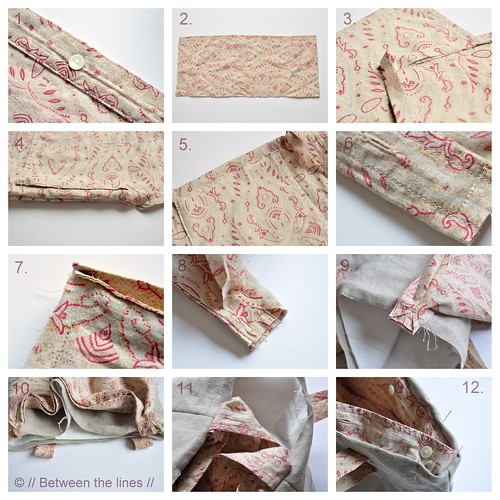
Step 5: The bag lining
This is probably the hardest part of the bag. The idea is to use the button closure of the shirt as the closure for the bag. If you haven't done so yet, cut the front of the body of the shirt to size.
5.1. Only if you have a printed shirt, or the fabric has a selvage: fold the button pad in, i.e. towards the wrong side of the fabric (the inside of the shirt) and top stitch into place - picture 1. The reason you do this is because you want the right sides of the fabric to face inside your bag.
5.2. inner pocket: cut the yoke to size taking into account seam allowance - picture 2. As the yoke was nicely top stitched in my case, I used that side as the top for the inner pocket. If this isn't the case on your shirt, however, take some extra seam allowance and finish off the top seam first, before continuing.
5.3. Fold in side seams and bottom seam of the pocket to be. Press with iron - picture 3. Next, pin the pocket into place and then top stitch onto the lining - picture 4 and 5.
5.4. Put both pieces of lining with the wrong sides up in front of you and close the buttons. At either end, you stitch the button and buttonhole part together with a couple of stitches to secure - picture 6.
5.5. Now fold the lining right sides facing and the buttons facing upward. Pin the side seams and bottom seam to make a bag. Next, stitch together, however, on both side seams, staying clear from the top edge (button closure) for about half the full width of the placket (button hole pad) - picture 7.
5.6. In order to box the top corners, fold the corners as shown in the picture 8. Do so for both top corners. Secure.
5.7. Box the bottom corners to the same size as you did for the outer shell of your bag (linen). With the right sides of the lining still on the inside, and hence the wrong side of the fabric facing you, you should obtain a boxed bag with two outward pointing "wings" at the top.
5.8. Now, pin the top corners (the wings) to the outside of the bag as shown in picture 9 and 10 and secure with a couple of stitches.
5.9. Place lining inside bag - the corners will fold in as shown in picture 11.
5.10. Pin the lining to the bag as shown in picture 12. Top stitch the bag and lining together. Done!
(Note: to avoid too thick a layer to sew through, trim the batting a little, and fold your outer fabric over the batting before starting to pin the lining to the bag.)
I hope I made myself clear enough, if not just drop me a line.
Good luck and happy re-purposing!

